 Tweet
Tweet
Originally posted by kenk
View Post
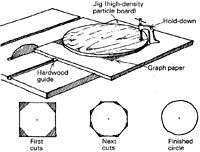
") My butcher block, expected to arrive tomorrow, as you know is a square, but making it circular may be something I do in the future, if it looks do able. Keep the pics coming. Also curious what your end grain boards final weight will be?
My butcher block, expected to arrive tomorrow, as you know is a square, but making it circular may be something I do in the future, if it looks do able. Keep the pics coming. Also curious what your end grain boards final weight will be?


 Schools starts back up in less than 2 weeks, and I will not have time to work on this afterwards.(until summer break)


Comment