Need ideas for custom platform drum

Collapse
X
 
  • Filter
  • Time
  • Show
Clear All
new posts
  • Bag-A-Holic
    Senior Member
    • Apr 2011
    • 179

    #46
    Originally posted by kenk View Post
    OK, finally finished gluing blocks together....next step is to cut out 27" dia drum...will keep posted...
    Ken, way to go, very impressive. You can see the time and effort you put into this project. I may have opted to take this route, if I had actually seen how it was done previously. I'm sure this will help others interested in building and using an end grain butcher block as a rebound board. It would be great to see pics how you do the circular cut too. You mentioned using jigs and such, but thats all Chinese to me My butcher block, expected to arrive tomorrow, as you know is a square, but making it circular may be something I do in the future, if it looks do able. Keep the pics coming. Also curious what your end grain boards final weight will be?
    -Anthony

    Comment

    • kenk
      Member
      • Dec 2012
      • 48

      #47
      AugustChief...Thankx for the link to cutting circle with a miter saw...I have a 12" miter-saw and can make the entire 5" deep cut with that blade....I will be rigging up a jig to cut circle...thankx again!
      Attached Files

      Comment

      • kenk
        Member
        • Dec 2012
        • 48

        #48
        just finished cutting drum...rough cut using circular saw...this drum is turning out better than I thought...really looks cool...5"thick...fir...surface is smooth...weighs about 50lbs...the surface seems super hard...bounced a speed bag off this drum and it really seems to rebound well...I'm very optimistic that this will meet all of my expectations...will finish cut using the 12" miter saw and jig and described by augustchief...

        OBTW...If you use "gorilla glue" ...you get "monkey hands"...this stuff does not come off!
        Attached Files
        Last edited by kenk; 01-14-2013, 06:03 PM.

        Comment

        • kenk
          Member
          • Dec 2012
          • 48

          #49
          Ralph...you'll have to tear it from my cold dead hands!...

          I will make sure I get a video of the speed bag sound after its installed (hopefully this week)...just lightly tapping a hammer across the surface, I can hear a high pitched sound, vs a thud...

          Comment

          • Bag-A-Holic
            Senior Member
            • Apr 2011
            • 179

            #50
            Boos, 24x24x6, End-Grain Butcher Block

            Ok so my Boos 24x24x6 Butcher Block arrived today. I was a little surprised when I opened the box. It didn't really look like the pictures that were shown on their website. I'll post pics of that too. On mine, there are many dark spots on the surface, like knots, which for the price I thought it would be more like the website showed, and picture perfect(like last photo below). I have a steel plate that I need to glue to the back and then figure a way to get holes in this thing. I don't have a drill press and will need to bring it somewhere to do it. This will be mounted to a Primefighter 400 platform, due to arrive next week. I will use the stock rebound board as a template for the holes on the custom board. I weighed the butcher block, it weighs 90lbs, and the steel plate is 40 lbs, a total of 130lbs.

            KenK's homemade Butcher Block that he is currently working on, and almost finished, is much more appealing and clean looking. In addition, he staggered the blocks, which appears to give it more strength. Ken also did an excellent job at making it circular as well. I may attempt to make mine circular tool, but will wait on that. I don't have much experience using a saw and don't want to wind up butchering my butcher block right away!
            Attached Files
            Last edited by Bag-A-Holic; 01-15-2013, 01:16 PM.
            -Anthony

            Comment

            • kenk
              Member
              • Dec 2012
              • 48

              #51
              Anthony...that's a nice big chunk of butcher block!...I wouldn't worry about the knots... probably a production issue..I cut out of all of my knots before assembling my drum...but is was a PITA...I would recommend the polyurethane glue as shown below for gluing the steel to the top of butcher block...make sure the steel is clean and grease free and the top of butcher block is grease/oil free too...coat both steel and maple with poly glue before gluing...then clamp together tightly for 24 hrs or so...

              I've got a jig ready to cut my drum to final diameter using my radial arm miter saw...will cut this afternoon if the rain stops....
              Attached Files

              Comment

              • Bag-A-Holic
                Senior Member
                • Apr 2011
                • 179

                #52
                Originally posted by kenk View Post
                Anthony...that's a nice big chunk of butcher block!...I wouldn't worry about the knots... probably a production issue..I cut out of all of my knots before assembling my drum...but is was a PITA...I would recommend the polyurethane glue as shown below for gluing the steel to the top of butcher block...make sure the steel is clean and grease free and the top of butcher block is grease/oil free too...coat both steel and maple with poly glue before gluing...then clamp together tightly for 24 hrs or so...

                I've got a jig ready to cut my drum to final diameter using my radial arm miter saw...will cut this afternoon if the rain stops....
                Thanks ken, but for the price I did't expect a any production issues!! Any how, be that it may, I will move forward. My question is, since I don't have any clamps, I was going to glue each surface, and then put the plate on the floor and then put butcher block on top of it. I was hoping that the weight. 90lbs, of the butcher block, would compensate for any clamping that may otherwise be needed. What do you think? And if I do still need clamps, how many will be suitable? 4 total, one on each side??
                -Anthony

                Comment

                • kenk
                  Member
                  • Dec 2012
                  • 48

                  #53
                  Anthony...I would recommend using four clamps...that PL3 is thick stuff, and you'll want to squeeze any excess out...

                  Comment

                  • Bag-A-Holic
                    Senior Member
                    • Apr 2011
                    • 179

                    #54
                    Major delay. I sent Boos the pictures. They apologized, and are sending UPS to pick up this one up. They said they'll start the manufacture of a new block, and it won't be ready for 2-3 weeks.

                    If you look at the back of the block, you can see large holes that were filled with glue or putty. Clearly not as pictured on their website!!! Do you think these holes compromise its strength? I'm thinking to instead, to try to negotiate a partial refund, and keep it, instead of waiting another 3 weeks. Schools starts back up in less than 2 weeks, and I will not have time to work on this afterwards.(until summer break)
                    Attached Files
                    Last edited by Bag-A-Holic; 01-15-2013, 03:14 PM.
                    -Anthony

                    Comment

                    • AugustChief
                      Member
                      • Dec 2012
                      • 88

                      #55
                      Originally posted by kenk View Post
                      just finished cutting drum...rough cut using circular saw...this drum is turning out better than I thought...really looks cool...5"thick...fir...surface is smooth...weighs about 50lbs...the surface seems super hard...bounced a speed bag off this drum and it really seems to rebound well...I'm very optimistic that this will meet all of my expectations...will finish cut using the 12" miter saw and jig and described by augustchief...

                      OBTW...If you use "gorilla glue" ...you get "monkey hands"...this stuff does not come off!
                      Your drum looks beautiful, and the staggered pattern looks seamless. Well done! I like your attitude and steadfast dedication, I have had Master Craftsman tell me I couldn't cut a circle with a Miter Saw...well, necessity ($$) leads to ingenuity. Nothing like a custom drum made by Monkey hands.

                      Comment

                      • kenk
                        Member
                        • Dec 2012
                        • 48

                        #56
                        Anthony: I'd negotiate a distressed sale deal with Boos...they're probalby just going to scrap the piece anyway....I'll bet they'll go for a 50% discount, if you keep it...assuming you're showing the backside, I would scrape out the filler and apply extra PL3 to the divots when you glue the steel plate to the back....

                        Augustchief...I just finished making the finished edge circular cut of the 5" thick disk on my 12" radial arm miter saw....It worked GREAT!...I would never have thought of using my saw to do that....thankx for the tip!...I guess that's why you're a Navy chief....CAN DO attitude!...All I did was to lay-down a 2'x4' piece of plywood on the saw...clamped plywood...drilled hole for rotation point...inserted a drill bit to use as a pivot...and lowered the 50 lb disk onto the pivot pt...then just made a bunch of small cuts...and that was it...perfect 90 deg angle...way easier than I thought....will post some pictures of the jig tonight and of the nearly finished drum...

                        Comment

                        • Bag-A-Holic
                          Senior Member
                          • Apr 2011
                          • 179

                          #57
                          Originally posted by kenk View Post
                          I'd negotiate a distressed sale deal with Boos...they're probalby just going to scrap the piece anyway....I'll bet they'll go for a 50% discount, if you keep it...assuming you're showing the backside, I would scrape out the filler and apply extra PL3 to the divots when you glue the steel plate to the back....
                          Ken, thanks for advice, I will try to resolve it that way, and follow those additional steps you mentioned, if so.

                          Originally posted by kenk View Post
                          .way easier than I thought....will post some pictures of the jig tonight and of the nearly finished drum...
                          Yeah cool, I wanna see that thiga ma jig!! If its at easy as it sounds, I may go for it too, being that this board seems it already has some war wounds already.
                          -Anthony

                          Comment

                          • AugustChief
                            Member
                            • Dec 2012
                            • 88

                            #58
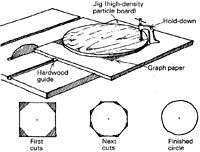
                            Circle Jig

                            Originally posted by Bag-A-Holic View Post
                            Ken, thanks for advice, I will try to resolve it that way, and follow those additional steps you mentioned, if so.


                            Yeah cool, I wanna see that thiga ma jig!! If its at easy as it sounds, I may go for it too, being that this board seems it already has some war wounds already.
                            The jig is depicted here, you can also accomplish this much easier on a table saw.

                            Shop Tip :How to cut circles from plywood or stock lumber with a table saw.This technique can be used to cut large diameter circles for use as tabletops, st...


                            Circle Jig:
                            Cut a dado in the underside of a 3/4-in. high-density particleboard base and glue in a hardwood key, sized for a sliding fit in the saw's lefthand miter slot. Wax the jig bottom and key to reduce friction. Measuring from the blade, accurately locate and paste sheets of 1/4-in. graph paper to the jig top to aid in layout.

                            To use, first cut the circle blank somewhat oversize and locate its center. Next mark the radius of the finished circle on the graph paper and pin the center of the circle blank at this mark. Make sure the blank will rotate freely but is firmly pinned to the jig. Start by lopping off the corners of the blank. Hold the blank and jig firmly while sliding them past the blade. If hand-holding the work appears unsafe, mount a hold-down clamp on the base to lock the blank while cutting. Continue cutting off the corners of the blank until it is almost round. Then, with the work just touching the blade, rotate the blank to trim off all the high spots. The smoothest circles are produced using high-quality, sharp carbide blades.

                            Here's a a visual aid :

                            Comment

                            • kenk
                              Member
                              • Dec 2012
                              • 48

                              #59
                              some more progress photos...just about finished....photo of circle cutting jig (barely had enough depth with 12" blade to cut 5" drum) ...finished drum after sanding and round over edge with router...photo of first coat clear poly spar gloss finish...
                              Attached Files

                              Comment

                              • Bag-A-Holic
                                Senior Member
                                • Apr 2011
                                • 179

                                #60
                                Originally posted by AugustChief View Post
                                The jig is depicted here, you can also accomplish this much easier on a table saw.

                                Shop Tip :How to cut circles from plywood or stock lumber with a table saw.This technique can be used to cut large diameter circles for use as tabletops, st...


                                Circle Jig:
                                Cut a dado in the underside of a 3/4-in. high-density particleboard base and glue in a hardwood key, sized for a sliding fit in the saw's lefthand miter slot. Wax the jig bottom and key to reduce friction. Measuring from the blade, accurately locate and paste sheets of 1/4-in. graph paper to the jig top to aid in layout.

                                To use, first cut the circle blank somewhat oversize and locate its center. Next mark the radius of the finished circle on the graph paper and pin the center of the circle blank at this mark. Make sure the blank will rotate freely but is firmly pinned to the jig. Start by lopping off the corners of the blank. Hold the blank and jig firmly while sliding them past the blade. If hand-holding the work appears unsafe, mount a hold-down clamp on the base to lock the blank while cutting. Continue cutting off the corners of the blank until it is almost round. Then, with the work just touching the blade, rotate the blank to trim off all the high spots. The smoothest circles are produced using high-quality, sharp carbide blades.

                                Here's a a visual aid :

                                Oh darn I dont have one of those saws either.

                                This is a really cool method though, and looks easy, and precise. I would practice on a few pieces of scrap wood, till I felt confident to proceed.
                                Makes we wanna go get a table saw like that, just go a cut circles, for fun.

                                If I didn't see this video, and someone wanted to bet me they could make a circle like that on that saw, I'd would've bet them, and LOST!!!!!!!
                                -Anthony

                                Comment

                                Speedbagforum.com is a participant in the Amazon Services LLC Associates Program, an affiliate advertising program designed to provide a means for us to earn fees by linking to Amazon.com and affiliated sites.
                                Working...